


 2 comments
As much fun to make as they are delicious to eat, these spiral biscuits can grace the holiday table – or be just the thing for weekend soup night.
Be sure to read Baking Together #38: Making Herbed Spiral Biscuits to get all the tips and variations before you start baking.
Makes 9 biscuits
For the filling:
- 2/3 cup (2 5/8 ounces) ground Parmigiano-Reggiano
- 3 tablespoons packed finely chopped basil or parsley
- 3 tablespoons packed thinly sliced chives
- 3/4 teaspoons finely grated garlic (I use a Microplane)
- 1/8 teaspoon kosher salt and pepper
- 4 tablespoons (2 ounces) unsalted butter, very soft
For the rolls:
- 2 cups (9 ounces) unbleached all-purpose flour
- 1 tablespoon baking powder
- 1 teaspoon table salt
- Pinch of ground cayenne pepper
- 8 tablespoons (4 ounces) unsalted butter, cut into 8 pieces and well chilled
- 2/3 cup (5 3/8 ounces) milk (whole or 2%)
Make the filling:
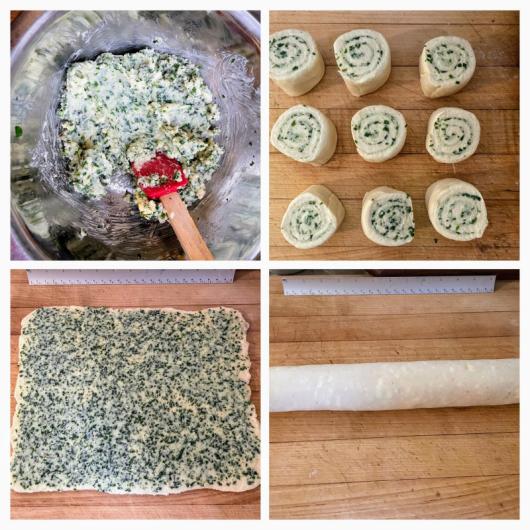
1. Combine the Parmigianno, basil, chives, garlic, salt and pepper in a small bowl and mix with a spoon until well blended. Stir in the very soft butter until well blended.
Make the rolls:
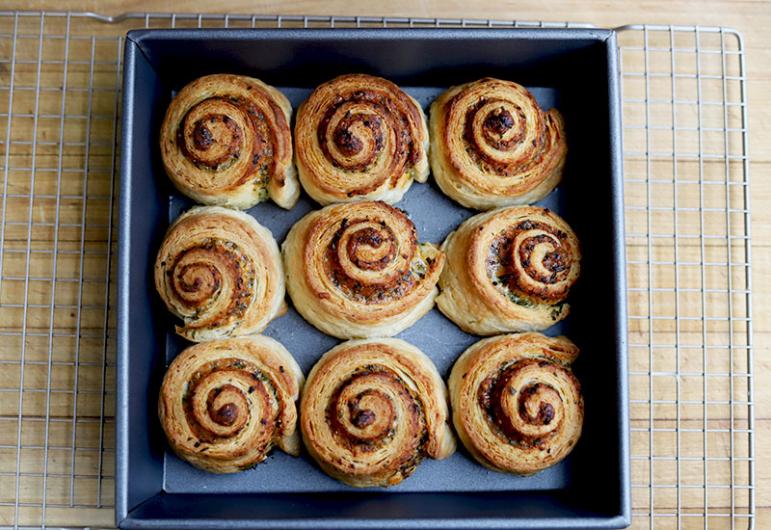
1. Have ready an 8 x 2-inch square pan.
2. Put the flour, baking powder, salt, and cayenne in a food processor. Cover the top of the work bowl with plastic (see note) and click on the top. Pulse two or three times until blended. Add the cold butter and briefly pulse two or three times until the butter pieces are slightly broken up.
3. Run a spoon or the tip of a small spatula through the center of the mixture to form a channel. (Don’t worry about perfection here). Drizzle the milk into the channel all the way around and pulse until it forms moist dough crumbles, about 30 seconds.
4. Scrape the dough and any remaining damp bits onto the counter and gently press into a 5-inch square (the edges will be a bit ragged). Using a rolling pin, roll the dough into an 18 x 6-inch rectangle (the edges will be still be ragged) lightly flouring the bottom and top of the dough as needed. Using a bench scraper, fold both short ends toward each other so they meet in the middle. Fold one half over the other half to make a rectangle. Turn the dough so that the closed seam is on the right and, using the rolling pin, press down gently but firmly on the edges to seal the layers.
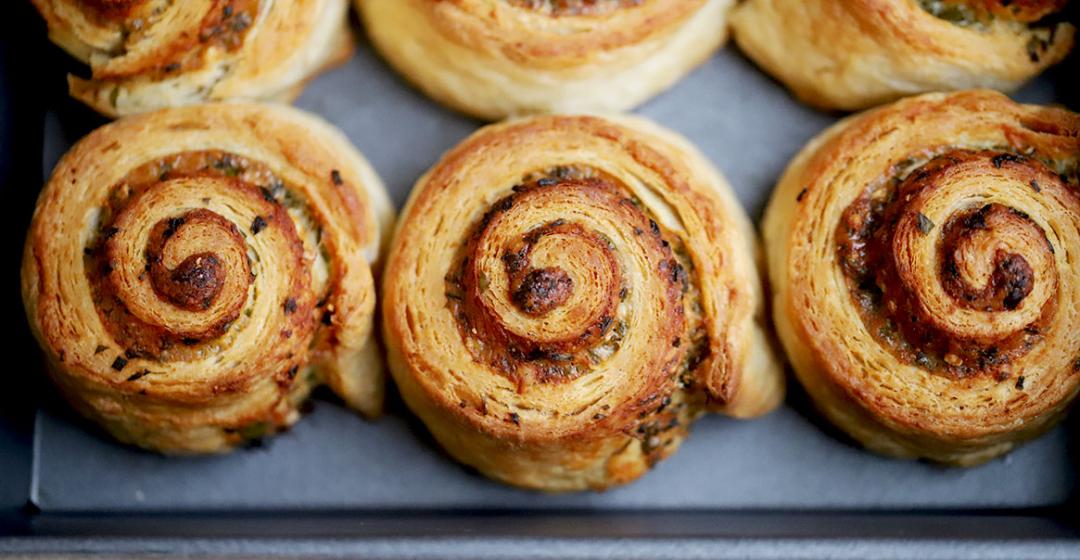
5. Roll the dough into a 12 x 10-inch rectangle (the edges will be slightly ragged) lightly flouring the bottom and top of the dough as needed. Turn the dough so that one long side is facing you. Drop the filling by the tablespoon, spacing evenly over the dough, and using an offset spatula, spread the filling evenly across the dough and all the way to the edges.
6. Beginning on one long side, roll up the dough, jelly-roll style and seal the edge by gently pressing/smearing the edge against the roll. Position the roll, seam side down, on the work surface. Using a sharp knife and a sawing motion, cut the roll into 9 equal pieces about 1 1/3 inches wide. Arrange the slices, cut side up, in the prepared pan and refrigerate the pan while heating the oven (at least 15-20 minutes). You can also refrigerate for up to 1 day before baking.
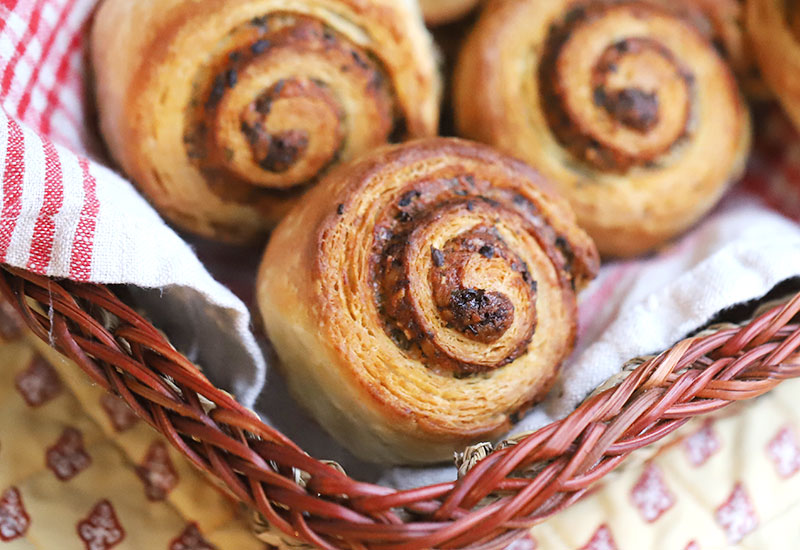
7. Position a rack in the center of the oven and heat the oven to 425°F. When the oven is heated and the biscuit dough and butter filling is firm, bake until the rolls are puffed and browned, 30 to 33 minutes. Move the pan to a rack and let cool for about 10 minutes. Invert the pan (use potholders if the pan is too hot to handle safely) onto a rack and lift off the pan. Separate the rolls and turn them right-side up. Serve warm.


Comments (2)