


 4 comments
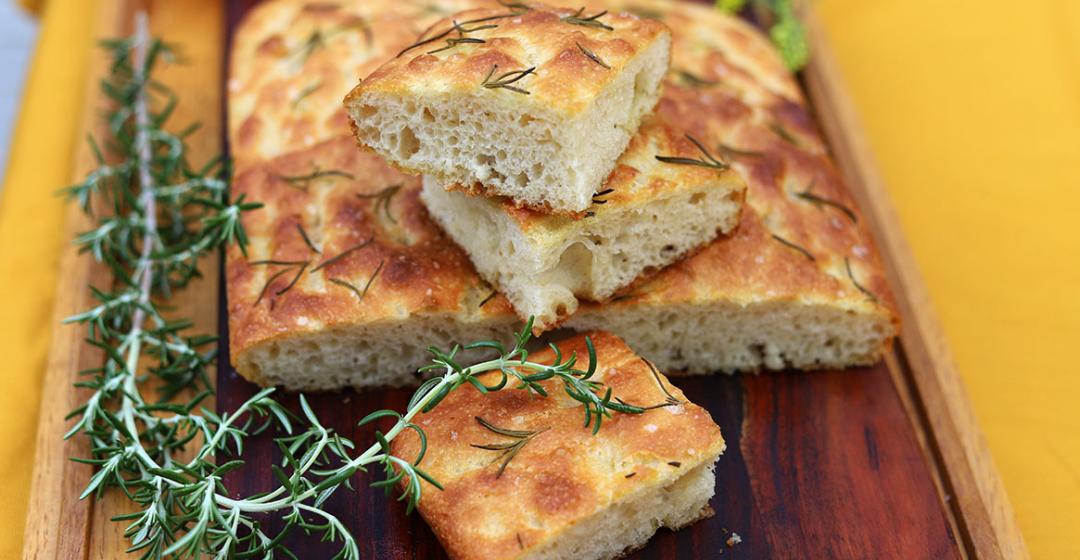
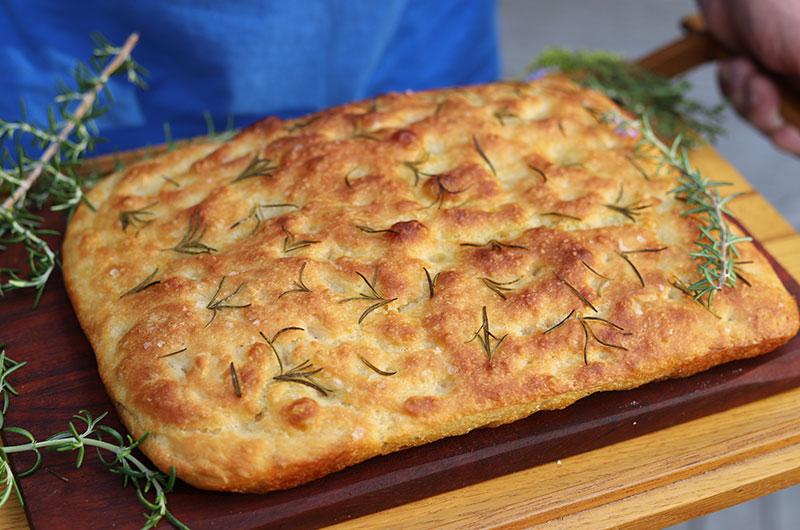
With a little bit of planning – and very little elbow grease – you can have delicious home-baked focaccia with a golden top, crisp edges and a tender, chewy interior. The secret is a slow cold ferment in the fridge (18 to 28 hours). Stock up on instant yeast and you can make this any time you like. I like to use a straight-sided 9 x 13-inch metal baking pan for this recipe, but a Pyrex 9 x 13-inch baking pan will do in a pinch. Before you start on the recipe, be sure to read all of the tips at Baking Together #28: Making and Baking No-Knead Focaccia.
Makes 9 to 12 servings
For the dough
3 1/3 cups (15 ounces) unbleached all-purpose flour
1 tablespoon granulated sugar
2 teaspoons table salt
1 1/4 teaspoons instant (called quick-rise and rapid-rise by different brands) yeast
1 2/3 cups (13 1/4 ounces) warm tap water (between 90° and 100°F)
5 tablespoons olive oil, divided; plus more for drizzling (optional)
For Finishing
1 topping combination, optional (see below)
1 teaspoon coarsely chopped fresh rosemary, plus more or less as desired
1/2 teaspoon flaky sea salt, plus more or less as desired
Toppings (optional)
Cherry Tomato
1 1/2 cups ripe cherry tomatoes, halved
1/3 cup pitted kalamata olives, halved
Roasted Red Pepper
1/2 cup (3 ounces) coarsely chopped, drained roasted red peppers
1/2 cup (2 ounces) crumbled goat cheese
Parmesan Cheese
¼ to ½ cup coarsely grated Parmigiano
One Day Ahead: Make the dough
1. Whisk the flour, sugar, salt and yeast in a medium bowl until well blended. Add the warm water and 1 tablespoon of the olive oil into the flour mixture. Using a wooden spoon or sturdy rubber spatula, stir until the flour is completely incorporated, about 1 minute. The dough will be wet and sticky. Unlike a classic, well-kneaded dough that looks smooth and shiny, this dough will look lumpy and bumpy and break into pieces if you pull on it.
2. Add 2 tablespoons of the olive oil to another medium bowl (9 to 12 cups). Tip and rotate the bowl to coat the bottom and about three-quarters up the sides with the oil (see note). Scrape the dough into the new, oil-coated bowl. Cover tightly with plastic wrap (two pieces in a crosshatch pattern if needed) and slide into the refrigerator for 18 to 28 hours.
On the Day of Baking: Shape, proof, and bake the dough
1. Add the remaining 2 tablespoons of olive oil to a 9 x 13 x 2 pan (I use metal with straight sides but Pyrex will work too. Tip and rotate the pan to coat the bottom and about three-quarters up the sides with the oil (see note).
2. Remove the dough from the refrigerator, uncover and save the plastic wrap. Using the fingertips of one hand, pull one edge of the dough away from the bowl and lift it up and over the dough, tucking it into the center. Turn the bowl slightly to the right and pull another edge of the dough away from the bowl and lift it up and over the dough, tucking it into the center. Repeat this process around the bowl twice, wetting your fingers as you work if the dough is too sticky.
3. Scrape the dough onto the prepared pan with the folded side down. Using your fingertips and working from the center outward toward the edges, gently pull and press the dough into a thick, rectangular shape. The dough is very elastic and will spring back. The shape and size aren’t a factor at this point as it will grow and fill the pan as it rises and then bakes.
4. Cover the pan completely with the plastic and let the dough rise in a warm, draft-free spot until it’s at least doubled in size, 2 to 3 hours depending on the ambient temperature. After about 2 hours, position a rack in the lower third of the oven and heat the oven to 425°F while continuing to let the dough rise.
5. When the oven is heated and the dough is puffy, bubbly and risen about three-quarters up the sides of the pan, remove the plastic. Dimple the dough by pressing wet fingers down to the bottom of the dough at about 2-inch intervals. It will deflate some but not to worry. If you are using the cherry tomato topping, evenly scatter the mixture over the dough. Drizzle 1 to 2 tablespoons of additional olive oil evenly over the top and sprinkle with the rosemary and coarse sea salt.
6. Bake until the bread is deep golden brown and the internal temperature is at least 200°F, 30 to 35 minutes (I like mine on the crispier side so I bake it for 34 to 35 minutes). Move the pan to a rack and let cool for 15 minutes. Using a large metal spatula, lift the loaf out of the pan and move to a rack to cool. The focaccia is best served the day it’s made, warm or at room temperature. Leftovers can be covered and stowed at room temperature for up to 4 days. Reheat or split pieces and toast before serving. You can also freeze the focaccia, wrapped in plastic and foil and frozen for up to 3 months. Thaw at room temperature and toast or reheat before serving.


Comments (4)