


Local peaches are making their way into the markets – yay! While I love biting into a ripe, juicy peach on a hot summer day, baking these beauties concentrates all those heavenly juices, making them even more delectable. Add to that the wonderful floral fragrance filling my home, and I’m pretty happy.
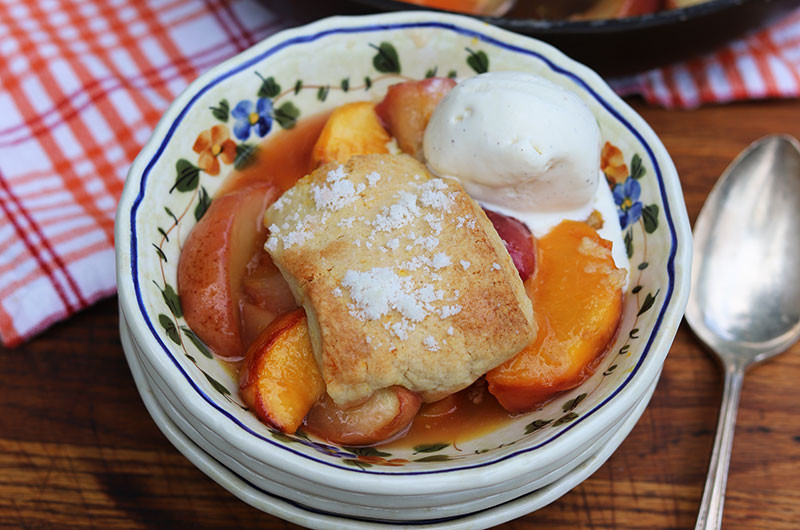
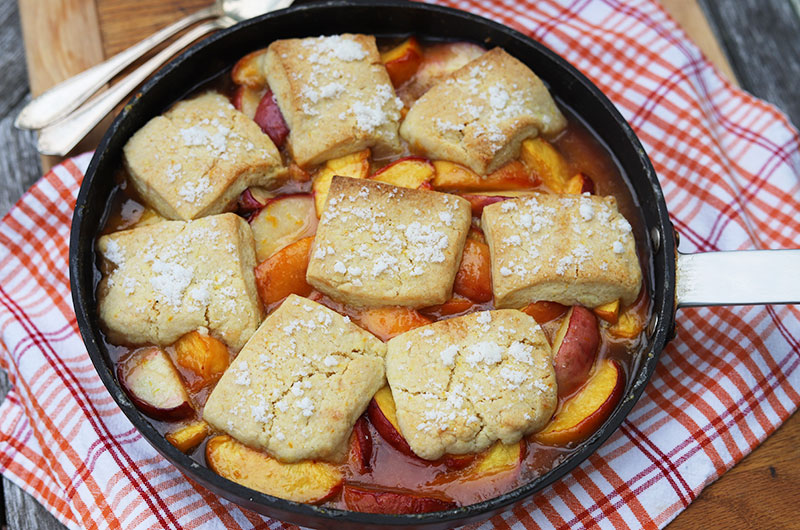
This Skillet Peach Cobbler with Ginger-Orange Biscuits is my ideal summer bake. It has it all: make-ahead elements (biscuit topping), loads of flavor variations (I love choices), minimal dishes (only one skillet for the filling – no bowl), starts on the stove and bakes up quickly (summertime = turn the oven off ASAP!), easy serving (as is or with whipped cream or ice cream) and most importantly it puts a smile on everyone’s face.
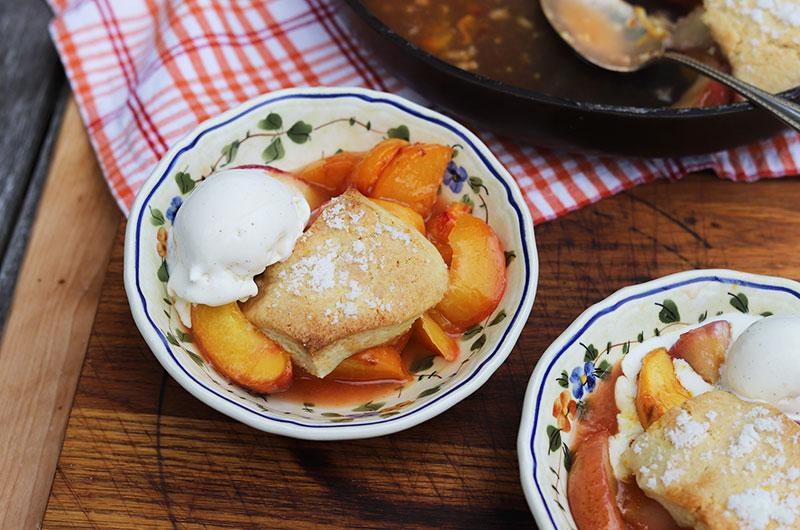
I like to keep the flavor profile simple so that the essence of these gorgeous, ripe peaches really sings. A touch of orange zest and a splash of orange liqueur or juice is all that’s needed. Slightly thickened with just a hint of cornstarch, the lightly sweetened juices are clear and sumptuous – the ideal consistency to pair with the biscuit topping.
And speaking of the biscuits, a flourish of orange zest and a good hit of crystalized ginger add a citrusy sweetness and a touch of heat that pairs beautifully with the peachy filling. These tender scone-like squares bake up on top of the fruit, forming charming, cobblestone-like biscuits. On a side note, I’ve also baked them solo on a lined cookie sheet and served them with a smear of honey butter for breakfast – swoon-worthy. Feel free to swap in toasted, chopped pecans or walnuts (or even chopped white chocolate) for the ginger if you’re so inclined. You can also swap in lemon zest for the orange zest in the biscuits as well as in the filling. The flavor is brighter and perhaps a bit tart but equally delicious.
Wondering about why I enlist a skillet for this cobbler? For starters, I like to keep summer bakes super stream-lined so I use the skillet as my mixing and baking vessel. I also like using a skillet so I can begin cooking the filling on top of the stove. Once the filling is bubbling and super-hot, I add the biscuit topping and finish baking in the oven. This way, the underside of the biscuits begins cooking in the hot fruit and juices, avoiding a soggy underbelly. It also shortens the baking time so I can turn my oven off as soon as possible.
This is a memorable and versatile summer fruit dessert that is equally at home as a weeknight treat or a weekend picnic with friends and family. Make it as written or check out the Kitchen Notes section below for some other swap-in ideas. Either way, please let us know what type of skillet cobbler you’ve baked up so we can all be inspired by each other. This is our 26th installment of Baking Together and we all want to be inspired by each other! Be sure to check out all the previous Baking Together recipes if you haven’t already.
Kitchen Notes
Buying and storing peaches
- When shopping for peaches, make sure each peach passes the sniff test. The fragrance should scream PEACH, if not, then move along to another peach or check out the nectarines. A peach that doesn’t have a hint of fragrance was likely picked too soon.
- Peaches should give slightly when gently pressed at their “shoulders” (the raised lip around the stem end).
- Firm-ripe peaches that pass the above tests can happily sit on your counter for a day or two. If they start to over-ripen, pop them into the fridge and use them as soon as you can.
- Reminder: Slightly over-the-hill stone fruit are still a solid destination for baked recipes like this cobbler. The fruit sections won’t be quite as pretty but the taste will still be delicious. I rarely, if ever, peel peaches before baking. The skins add color to the baked cobbler and they don’t detract from the texture.
Cobbler Topping
I use a food processor for this recipe but you can use a pastry blender and a bowl to hand mix if you like.
I like these biscuits to have clean edges so I press the dough into a slightly larger rectangle and trim away the ragged edges. But for a more rustic look, feel free to shape the dough into an 8-inch x 4-inch rectangle and don’t bother trimming the edges before you cut them.
Sugar Topping (optional)
Using a small spoon, mix 2 tablespoons granulated sugar and a scant 1/8 teaspoon water in a ramekin until well blended and forms small clumps. Use immediately or cover and stow at room temperature for up to 2 weeks (use a fork to break up any large clumps).
Fruit Swaps
Another type of stone fruit, like multi-colored plums or nectarines, or a combination of fruit (peaches and blueberries anyone?) will work in this most versatile recipe. You’ll want a total of about 2 1/2 to 2 3/4 pounds of fruit for a well-balanced cobbler.
Make Ahead
The biscuit topping can be prepared through Step 2 and refrigerated, covered, for up to 2 days before completing the recipe. Or you can prepare the biscuits through step 2 and freeze them for up to one month before completing the recipe. Arrange the cut, unbaked biscuits on a small, lined cookie sheet and slide into the freezer until very firm, about 30 minutes, before transferring into a freezer container. When ready to bake, set the biscuits out on a work surface while preparing the filling and proceed accordingly.
Leftovers (if you have any)
Transfer individual portions of the filling and topping into small, heatproof bowls or ramekins, cover and refrigerate up to 3 days. For best results, reheat in a 350°F oven (a toaster oven works well) until warmed, 10 to 15 minutes.
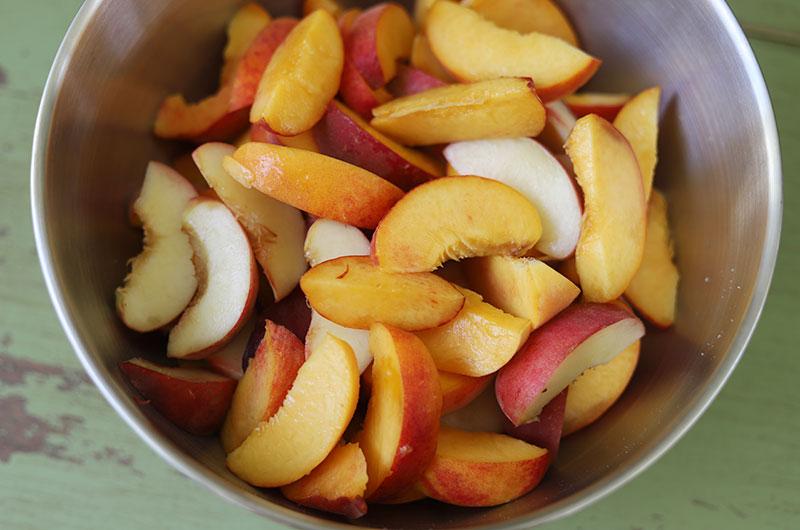
How to cut a peach
1. To slice a peach, hold the fruit in one hand and use a small paring knife to slice from the stem end to the bottom, right around the pit. Do this on both sides of the pit.
2. To open the peach, firmly but gently hold it in both hands and twist each half in opposite directions, releasing one half from the pit.
3. Arrange the pit-less half on a work surface and cut lengthwise into 3 or 4 wedges.
4. To cut the peach half with the pit, make the same lengthwise cuts around the pit and gently pull the wedges off the pit.
That said, if you have a stubborn peach that won’t twist away from the pit, arrange the fruit on a work surface with the stem end facing up. Position a knife just off center and cut down one side. If the knife meets resistance, you’ve hit the pit. Adjust the knife slightly farther from the center and try again. Repeat with the other sides and slice into wedges.