


 2 comments
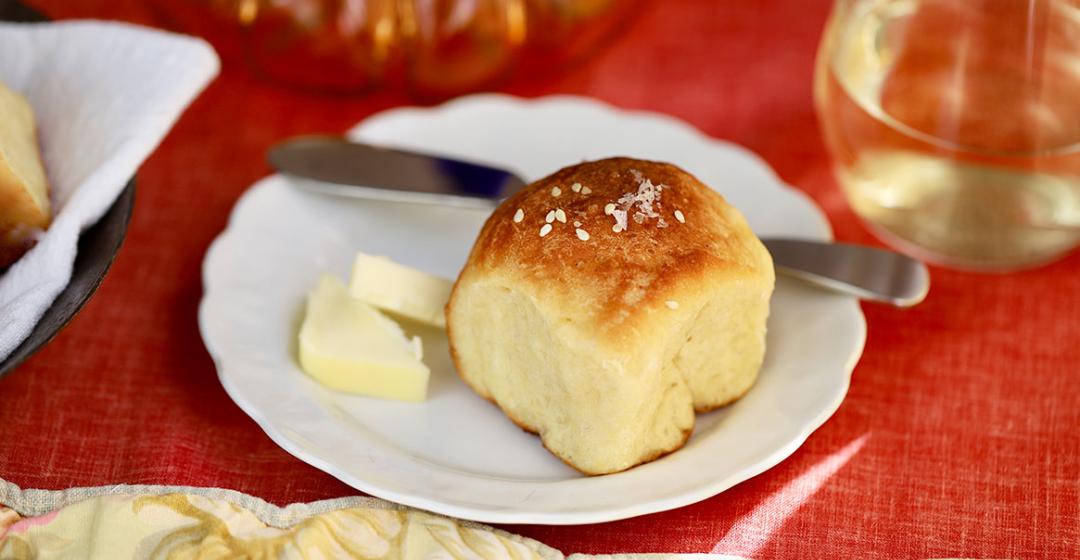
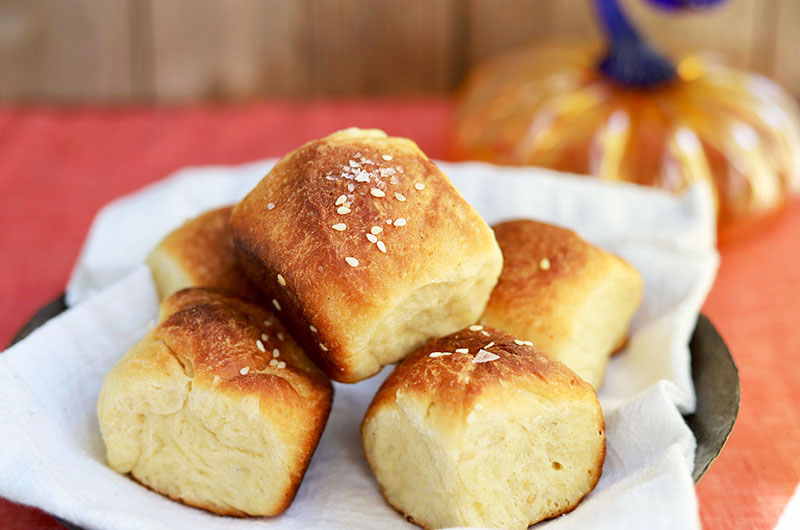
I designed this dinner roll recipe to yield just 8 rolls (which are baked in a loaf pan) — perfect for a smaller crowd. These soft, golden buttery rolls aren’t just for Thanksgiving; try them year-round with soups and stews. No stand mixer needed! Be sure to leave time in your schedule for these rolls to rise twice – about two hours total.
Before you gather your ingredients and start baking, be sure to read Baking Together #18: Small Batch Dinner Rolls, or you can also find all the tips and techniques at the bottom of this page.
Makes 8 rolls
For the dough
- 1 1/2 cups (6 3/4 ounces) unbleached all-purpose flour
- 1 1/4 teaspoon quick-rise (instant) yeast
- 3/4 teaspoon table salt
- 1/4 cup (2 ounces) whole milk
- 2 tablespoons (1 ounce) unsalted butter, cut into 4 pieces
- 4 teaspoons honey
- 1 large egg
For the glaze and topping
- 2 tablespoons (1 ounce) unsalted butter, melted
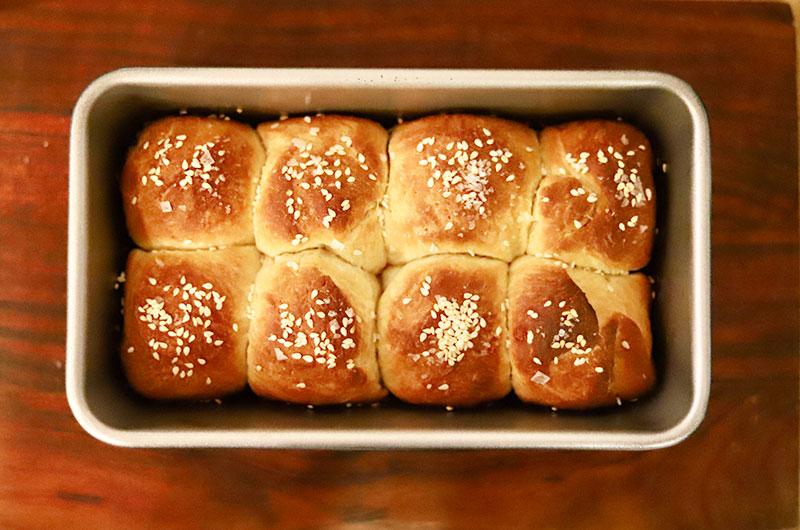
- 1 to 3 teaspoons toppings (coarse salt, poppy seeds, “everything” seasonings, etc), optional
Make the dough
1. Put the flour, yeast, and salt in a medium bowl and whisk until well blended. Heat the milk until very hot but not boiling. (I do this in a Pyrex measure in the microwave.) Add the butter and honey and stir until melted. Check the temperature using an instant-read thermometer. For the yeast to activate, the liquid needs to be between 115° and 125°F.
2. Pour the warm milk -butter-honey into the flour mixture along with the egg, and using a silicone spatula, stir until the flour is completely incorporated. It will be very thick and sticky.
3. Scrape the dough onto the counter and, using a bench scraper and one hand, knead (see technique notes below), until it is smooth, no longer sticks to the counter and passes the windowpane test (see note below), about 15 minutes. Lightly grease the sides of the bowl and put the dough back in. Cover the bowl with a plate or plastic wrap. Let rise in a warm spot until doubled in size, about 60 minutes depending on the ambient temperature.
Shape the rolls
1. Lightly grease the bottom and sides of a loaf pan and have the melted butter ready and in a small bowl. Scrape the dough onto an unfloured work surface and gently stretch and shape into a 4 x 8-inch rectangle – no need to deflate the dough completely. Using the bench scraper, cut the dough into eight relatively equal pieces.
2. Roll the dough pieces, one at a time, in the melted butter and arrange side by side in the prepared loaf pan. The dough pieces can be cozy in the pan depending on the size and shape. Pour any remaining butter over the rolls. Cover loosely but completely with plastic wrap and let the dough rise in a warm spot until doubled in size, about 60 minutes depending on the ambient temperature.
Bake the rolls
1. As the dough nears its risen height, position a rack in the center of the oven and heat the oven to 375°F. When the rolls have doubled in size, remove the plastic and sprinkle the seasoning, if using, over the dough. Bake until the rolls are puffed and deep golden brown (an internal temperature of 200°F to 205°F if you want to check), 20 to 22 minutes. Move the pan to a rack. Serve warm or let cool completely, cover, and stow at room temperature for up to two days. Leftovers are delicious when reheated in a warm oven or split, toasted and served with a smear of butter.
Technique Notes
Equipment: If you have a smaller-sized stand mixer with a dough hook, feel free to let it do the kneading work for you. However, if there isn’t a stand mixer on your counter or you only have a larger one – no problem! This small batch of dough can be made without the mixer. Sure, hand-kneading a sticky dough like this one can seem daunting at first but it really just takes some patience and faith in the process.
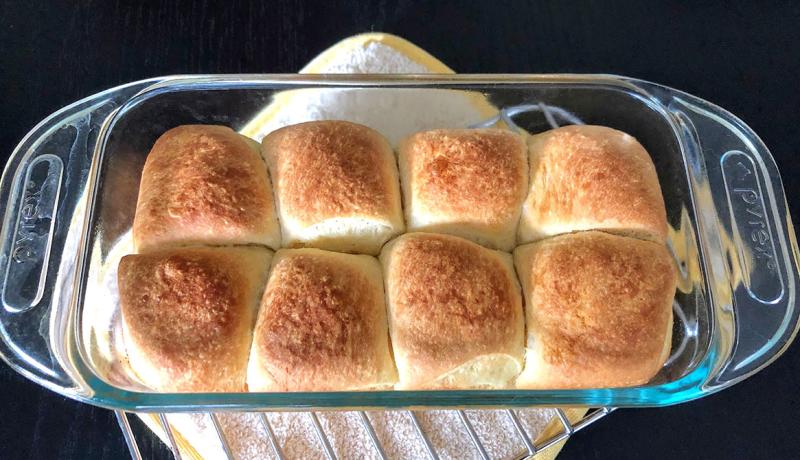
Loaf pans vary in size and shape depending on the manufacturer. Some are straight-sided and others are more sloping; some are slightly larger. This recipe doesn’t require an exact size or shape. The baked results will differ slightly – taller and straighter versus wider and more rounded respectively – but the taste and texture won’t change a bit. For reference, I bake mine in an older model 6- cup Pyrex (8 1/2 x 4 1/2 x 2 3/4 inches) but an 8-cup loaf pan (10 x 5 x 3 inches) will work out just fine. Metal loaf pans will brown the rolls a tad more than Pyrex, so keep an eye on cooking times with these and don't overbake.
On shaping the rolls: Making the dough takes a bit of elbow grease but once you have accomplished that step, you can relax as I’ve taken the stress out of shaping the rolls. Instead of the normal practice of precise measuring and perfect shaping technique, I’ve opted for a more carefree method to create charming, rustic rolls. They might vary a bit in size but every bite just as soft, buttery with a slight hint of honey sweetness.
Two Kneading Techniques
French Style: I like to use a French-style kneading technique. All you need is a clean, unfloured counter and a bench scraper tool. Scrape the super sticky dough onto an unfloured counter. With the bench scraper in your dominant hand, use it along with your opposite hand to lift the dough and slap it back onto the counter once or twice, stretching and folding the dough over on top of itself and giving it a quarter turn. Repeat the lifting, slapping, folding and turning process until the dough no longer sticks to the counter and passes the “windowpane” test (see note), about 15 minutes.
American Style: With bench scraper in your dominant hand and using the heel of your opposite hand, push the top part of the dough away from you and fold that piece over the dough nearest to you and give the dough a quarter turn, using the bench scraper as needed. Repeat the pushing, folding and turning process until the dough no longer sticks to the counter and passes the “windowpane” test (see note), about 15 minutes.
Windowpane Test
This is the best way to test to see if the dough has been kneaded enough.
Use the bench scraper to cut off a piece of the dough. Holding it between the thumb, index and middle fingers on both hands, gently pull in opposite – north to south and east to west - directions. If the dough breaks apart, continue kneading and retest after a minute or so. If the dough stretches evenly and thinly until it holds an opaque film or “windowpane,” it’s ready to set aside to rise.


Comments (2)